Help Center
Use our Help Center to answer Frequently Asked Questions
Siska, Inc. sells eyelets, grommets, rivets, and more to only companies, not individuals. Please call our office and speak to a customer service representative on our toll-free line 800-393-5381. You may also visit our contact page and fill out an inquiry form via email. It is also possible to fax your quotation or order to us.
We accept all major credit cards for hardware and tooling orders. Please call our office if you would like more information on how to purchase a setting machine.
Hours of operation: 8:00 am – 5:00 pm EST
Phone: 800-393-5381
Fax: 201-794-8147
 Many people think that if you use a washer with your application, you are using a grommet. This is not the case. The main difference between an eyelet and a grommet is that the grommet has a larger flange diameter in relation to the hole size than an eyelet. The larger flange is used for additional holding strength in high-stress applications such as tents, banners, and flags. For most applications, an eyelet with a washer will provide more than adequate holding power, if set properly.
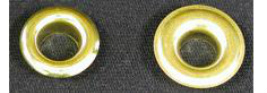
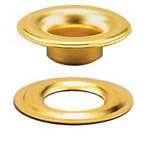
Grommets tend to look more “industrial” and do not have the “finished look” of an eyelet. Eyelets are the main choice in garments, belts, hats, shoes, and other applications where aesthetics matter. People also often choose to use eyelets when binding paper, booklets, calendars, and for hole reinforcement in tags and labels. The small flange of the eyelet does not detract from the overall appearance of these items since it is not as pronounced as the flange on a grommet.
Below is a picture to illustrate the point. On the left is an eyelet with the same inside hole diameter as the grommet on the right. Notice how much larger the flange on the grommet on the right is versus the eyelet on the left.
In order to buy the right eyelet to suit your application, these are factors that you need to consider:
- What eyelet hole size am I looking for?
- What is the overall thickness of the material to be eyeleted?
- Is the material stretchy, flexible, or rigid?
- Do I want the eyelet to be visible in my work for decoration purposes?
The hole size, in most cases, can be easily determined. If the purpose of the eyelet or grommet is to provide support for a cord, drawstring, or metal hook, a slightly larger inside diameter (ID) or hole size is needed, so that the cord or chain can easily fit through it.
Most eyelet sizes are listed by the outside diameter (OD) of the barrel. To determine the ID of the eyelet, take the OD and minus the meta thickness of the barrel twice. This will give you an approximate ID of the eyelet.
Most grommet sizes are listed by the ID so there is no need to figure this out. In most applications, the eyelet or grommet, if not there for pure decoration, is there to serve a purpose. This may be re-enforcement of the hole or binding two or more pieces of materials together. In these cases, the smallest eyelet that will perform the operation is usually selected as not being the most pronounced feature of the application. In these instances, a small hole, as well as a small flange, is desirable. If the eyelet is there for simple decoration purposes, the size of the eyelet or grommet hole and flange are a matter of personal preference.
Probably the most important factor in selecting an eyelet or grommet is the thickness of the material. The thickness and type of material will determine the correct barrel length of the eyelet or grommet. If the barrel length is too long, the eyelet or grommet barrel will collapse or crack during the setting procedure. If the barrel length is too short, the eyelet or grommet will not set properly into the material, resulting in a weak setting that will pull out.
No two applications are alike so it is impossible to publish a specific standard as to just how much barrel length of an eyelet or grommet should be allowed to obtain a proper roll or scored setting. For a description of a roll and score setting, visit our die page.
In rigid materials, usually less length is required than in softer or more flexible materials. In materials that are soft or flexible, more barrel length is advantageous so a wider roll or score setting can be used for added strength. If the material is stretchy or very thin as in a paper binding application, a washer should sometimes be used for added holding strength. In stretchy material, a wider flange is desirable. Where parts are to be assembled and left to rotate (as in a pinwheel), a longer barrel is required.
To select the proper length of an eyelet or grommet, determine the overall thickness of your application, including the thickness of a washer if one is used, and add the additional length from the above chart. For a final determination after selecting an eyelet, let us set some samples in your material (at no charge) to insure the proper length. If you are not sure which type of grommet or eyelet to use, send us your samples and we will be more than happy to set different fasteners for your testing and approval.
There are three basic types of grommets that are industry standards. These grommets are sized according to the hole size in the grommet after the grommet is set. Grommet numbers start with #00, then #0 through #8. The larger the number, the larger the grommet hole size. For a complete list of sizes available with dimensions, see our grommet page.
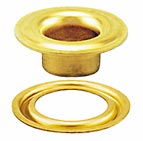
Plain Grommets and Washers
 They are the most common grommets used. The flange of the grommet is slightly domed and the edges are flat. The accompanying washer has a slight cup in it but does not have any teeth or spurs. Plain grommets can use a tooth washer for additional holding strength. These grommets are the most economical and are widely used in banners, flags, and tarps.
Rolled Rim Grommets and Spur Washers
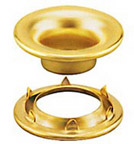 They are heavier than regular grommets and are used in applications where maximum holding strength is needed. Rolled-rim grommets and spur washers interlock with their teeth grasping the material and providing a stronger setting than plain grommets. Rolled-rim grommets and spur washers have their size embossed on the flange for easy identification.
Self Piercing Grommets
 They are grommets that pierce your material without pre-punching a hole. The self-piercing grommets use a heavier gauge metal than plain grommets and work together with a unique washer, allowing the grommet to pierce and set in a single action. Just place the grommet in the top die, lay the washer on the bottom die, position your work and pierce, and set in one action.
When placing an eyelet in your work, having the proper size hole is essential in getting a good setting. How the eyelet hole is made is also important depending on the type of material that you are eyeleting. If your material is rigid and has no stretch, then a hole can be cut. If the material is stretchy, then piercing a hole with a pierce point or bodkin point die will yield a better setting (to go to the Siska Die page, click here).
This article will concern itself with those materials that require a hole to be cut. All eyelets are sized by the Outside Diameter (OD) of the eyelet barrel. The size of the hole should be at least .004 (4 thousands) larger than the OD of the eyelet barrel but no larger than .015 (15 thousands). Using a hole this size can be as large as the Inside Diameter (ID) of the washer.
Grommets have a tapered barrel and their dimensions are usually stated as the hole size after setting. Example: a #2 plain grommet has a hole size after a setting of 3/8th of an inch (.375”). To determine what hole size to cut for a grommet, the ID of the accompanying washer should be used as the hole size.
Example: a #2 washer has an ID of .453”. Making a hole that is larger than needed will result in a weak setting with the possibility that the grommet or eyelet will pull out under pressure.
There are a number of factors that determine what type of setting machine you should use. The quantity of work that needs to be done is an important factor.
If your eyelet or grommet setting needs are very infrequent then a hand-setting tool that you hit with a mallet will do. (go to the hand setting tool page) These types of setting tools are used mostly in repair work where the repair must be done in the field. The hand-setting tools are a primitive way of setting an eyelet or grommet and do not usually lead to the best setting. It is hard to determine how hard you have to hit the top driver to set the eyelet or grommet and multiple settings usually do not come out consistent. If the top driver is held at a slight angle, one side of the grommet will set more than the other, resulting in an uneven roll setting.
If your application requires consistent pressure settings, the next option is the tabletop bench setters. These setting machines are equipped with an adjustable stop to regulate the exact amount of pressure applied. In applications such as attaching an eyelet to a computer board or making a pinwheel, oversetting an eyelet would result in a crushed and broken computer board or a pinwheel that did not spin.
The benchtop setters deliver a straight, even pressure that results in a perfect setting time after time. Once the stop is adjusted, there is no fear of over-setting or under-setting the eyelet or grommet. These machines are totally manual, and your work is hand fed. Siska Inc. has benchtop hand setters that will set the smallest electronic eyelets all the way up to a #6 grommet.
Since all these setting machines are hand feed only, they are a slow method of setting an eyelet or grommet. If your application requires you to set up a few thousand eyelets or grommets, these machines would be sufficient. (go to the bench top eyelet setting machine page)
The next progression in machines would be the foot press setters. The advantage of a foot press is that both your hands are free to hold the work and hand feed the eyelets, grommets, or washers. The foot presses also make it easier on the operator since most people’s legs are stronger than their arms. Higher quantities can be set each day with a foot press versus a hand press because there is less operator fatigue. Foot presses are available to set the smallest electronic eyelet up to a #8 Rolled Rim Grommet. (go to the foot press setting machine page)
If you have a job that requires setting 10 thousand eyelets or grommets or more, then an auto-feed foot press is appropriate. The eyelets or grommets are fed into a hopper on the side of the machine and are automatically placed into your application with foot power. The advantage of the auto-feed machine is speed. Only your work has to be placed on the setting machine as the eyelets or grommets are fed automatically. You can expect an increase in production of at least 3 to 1 over a hand-feed foot press. (go to the 489 auto feed foot press setting machine page) For higher production, the foot press can be air assisted or electric-powered. This will all but eliminate operator fatigue and result in higher production even after 5 or 6 hours of work since only a tap of your foot activates these machines. (go to the 489 air/electric powered eyelet setting machine page)
The next step to increased production is the automatic two-cycle eyelet or grommet setter. These machines are electric-powered tabletop models that are actuated by tapping a foot pedal. The machine quickly cycles twice, cutting the hole on the first cycle and setting the grommet or eyelet on the second cycle. This entire process takes less than a second. An example of this type of machine is the “Model F”. (go to the electric powered heavy duty setting machines page)
Another factor in machine selection is how far the eyelet or grommet is set from the edge of your application. Throat depths vary on all machines and some machines are only capable of setting an eyelet within 4 inches of the edge of the work. The throat depths are listed on our machine pages and are an important factor to consider.
If your application requires you to set eyelets or grommets up to a size 0 in a series, there is no finer machine on the market than the Siska Rapid Eyelet Machine. This machine was specifically designed to manufacture belts and shoes. The machine is capable of punching a hole, setting an eyelet, and feeding the material in rapid succession and can set 5 eyelets one inch apart in less than 3 seconds. (go to the Siska Rapid Eyelet Machine page)
Siska Inc. has been building eyelet machines since 1938 and is in its fourth generation of ownership. We can make selecting the appropriate setting machine easy. Just send us a sample of your job and we can recommend the right machine. For more complicated applications, we can make a videotape of our setting machines in action with your material.
Dies for hand feed machines, benchtop presses, and kick presses use 2-piece die sets. The bottom die
has some type of point on it, depending on the die style. For a list of the different die-style options, see
our DIE PAGE. The top die has a seat cut into it which cradles the flange of the eyelet and pushes it down
through your work and against the bottom die where the actual setting takes place. Secure the top die
and bottom die in your machine.
Instructions for Cut & Set
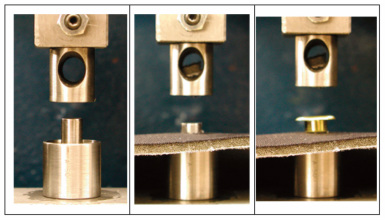 If you are using a washer, put the washer on the bottom die first. If the washer has a slight bevel to it, put the bevel facing up (similar to a saucer for a coffee cup).
- Place your work over the bottom die and cycle the machine. The machine will cut a hole in your material and force it down on top of the pilot of the bottom die.
- Place your eyelet or grommet barrel side down on the bottom die, pilot.
- Cycle the machine again to complete the setting.
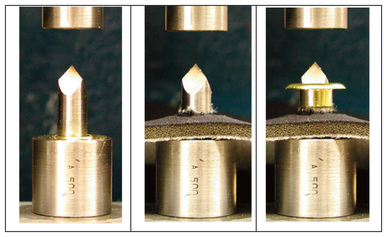
Instructions for Locating Point Die
Locating point dies are used when there is a pre-punched hole in your material.
- If you are using a washer, put the washer on the bottom die first. If the washer has a slight bevel to it, put the bevel facing up (similar to a saucer for a coffee cup).
- Place your material over the blunt point of the bottom die.
- Place your eyelet or grommet barrel side down on the bottom die, pilot.
- Cycle the machine to complete the setting.
Instructions for Bodkin & Spear Point
 If you are using a washer, put the washer on the bottom die first, If the washer has a slight bevel to it, put the bevel facing up (similar to a saucer for a coffee cup).
- Hold your material firmly between your thumbs and pull the material over the sharp point of the bottom die pilot. The bottom die point should now be sticking through your material.
- Place your eyelet or grommet barrel side down on the bottom die pilot.
- Cycle the machine to complete the setting.
CLICK HERE FOR INSTRUCTIONS
The setting pressure on an eyelet or grommet machine can be set in a few ways, depending on the style of the machine. On a simple kick press or benchtop machine, there is usually a stop pin with an adjustable screw and nut that limits the stroke of the foot pedal or arm. By adjusting this screw, you will only be able to pull the arm or kick the pedal to a measured distance thus regulating the amount of setting pressure.
If your machine is a power machine, ALWAYS TURN OFF THE POWER before adjusting the setting pressure. On standalone machines such as the Stimpson 489 Eyeleter, the bottom die can be raised or lowered to adjust the setting pressure.
The higher the bottom die is raised, the more the setting pressure is increased. Lowering the bottom die lowers the setting pressure.
Most standalone machines have a lock screw that holds the bottom die in place. You must first loosen this screw or allen screw to adjust the die up or down. Loosen the locking nut on the bottom adjusting screw. Now raise or lower the bottom die by turning the bottom adjusting screw clockwise or counterclockwise. Turn this screw ½ turn and check the setting. IF YOUR MACHINE IS ELECTRIC-POWERED, DO NOT CHECK THE SETTING PRESSURE UNDER POWER. ALWAYS TURN THE MACHINE OVER BY HAND. When you achieve the proper setting pressure, tighten the locknut on the adjusting screw and then tighten the locking screw to hold the die in the setting machine.
 The Stimpson 489 Eyelet Machine was produced in two basic head configurations – a regular frame and an “S” frame. The difference is the type of bottom arm that the machine was equipped with. The 489 Regular has a bottom arm of cast iron similar to the rest of the head and base. The 489 “S” version has a round steel arm. The tooling or dies for these machines are not interchangeable. The bottom die is a different diameter and the top die and spindle are different lengths. When ordering tooling for your 489, it is important to know what basic configuration your machine is. This same configuration also applies to Stimpson 469 Deep Throat Eyelet Machines. To the right, is a diagram of the two types of heads.